Showing posts with label Text Tutorials. Show all posts

Thursday, June 16, 2011

DMS Help: Cool Text Effects in Photoshop

Is your text feeling a little flat in your latest Photoshop project? Feel like your words need a bit more flare?

Here' s your answer: 50 Photoshop tutorials that show you how to bring new life to your text. Check them out and make your text demand attention.

DMS Help: Creating Grunge Effects in Photoshop

The grunge style is in. Contemporary design is loaded with images that seem to have been left out in the rain. Even so the grunge style is often very visually appealing. But how do you create these effects?

Actually, the grunge look is easier than you think. Here's a list of 40 great tutorials on how to create a variety of grungy effects in Photoshop.

Take a look and get grungy.

What is AR?

"AR" is an acronym for "augmented reality." For those who don't know AR is adding digital images, text or information to a real-time image/video of the real world.

Take the photo to the left, for example. The iPhone user is pointing the camera on his phone at a building. The application then provides the rest of the information and overlays it on a visual layer.

Take a look at this video, it's a more fun application of AR:

Virtual Ribbons from James Alliban on Vimeo.

I know it seems like this technology is WAY beyond anything you can do at this point, but it's not. You can do it in Flash. Check out this tutorial from Adobe and learn just how easy it can be to create amazing AR applications.

Interactive Media: Flash, pt 4 - Getting Started with Animation

Once you get to the point where you can draw in Flash with some competency you need to learn how to animate.

For those of you who are AU students, the best place to go for this type of training is Lynda.com. But, if you're not or you just want to learn how to do some pretty amazing stuff with Flash animation (such as 3D graphics or even augmented reality), Adobe's Developer Connection website has a large number of tutorials on animating in Flash. Most of these tutorials are text tutorials, though there are a few videos, but don't let that dissuade you. You can learn some REALLY amazing things from these tutorials.

So check out the listing and learn to make some amazing animations and more.

Thursday, January 13, 2011

DMS [Awesome] Help -

Watch this and tell me it's not an awesome intro.


Any interest in learning how to do this? Or maybe you'd like to learn how to add amazing special effects to your PREEXISTING film. Or maybe you need to spice up your motion graphics portfolio?

Either way, you MUST see Video Copilot (the video above was done after using a Video Copilot tutorial). It's a website that offers a huge number of truly stunning After Effects tutorial. If you wanna stand out, this is site to learn how. Click this to make sublime motion graphics. Just hold your mouse over any of the images and you'll see just how sophisticated (and professional) some of these effects can look

DMS Help - Awesome Photoshop Effects to Jazz Up Your Project

Photoshop CS5 (academic price): $250

Stock photo of a blonde holding back her hair: $5

Taking the time to check out the tutorial below on how to spice up the photo of the blonde: $0 + 60 minutes

Putting this image up on the board during project presentations in your class (and consequently showing up all your classmates): Priceless

There are some things money can buy, but for everything else there's Photoshop.

And the best part is, the effects you see in this image are not hard to reproduce. Nor are the rst of the effects in this amazing list of awesome Photoshop effects tutorials: CLICK ON THIS RIGHT NOW!

Thursday, November 18, 2010

Todd's Tips - Learn HTML and CSS. Now!

Kind of a sad state of affairs, no? I think one thing we can take away from this image is the idea that there are so many WYSIWYG applications out there that actually writing HTML code has become a sort of lost art.

But it shouldn't be.

HMTL (Hypertext Markup Language) and its companion CSS (Cascading Style Sheet) are essential for creating high-quality websites. While the WYSIWYG (What You See Is What You Get) applications like Dreamweaver and Front Page can take you a long way, when you really need to alter the page in a minute way to fit your awesome idea, you're gonna need HTML and CSS.

Let me explain...

A web browser, like the one you're using now to read this, is built to read HMTL. At least, that was the original idea. HTML allows you to upload text (Hypertext) to the net. In the beginning one could only do the bare minimum of formatting with barebones HTML. But, after a while, CSS came along. CSS is a scripting language that acts on HMTL elements in a page. It can add a number of attributes such as color, size and most importantly positioning. Moreover, it can also be used to position Java Script objects, Flash files and other, more interactive elements. So as of right now the basic developmental elements of a web page are its HMTL base and a linked CSS file that tells all those HTML elements where to go.

So, in order for you to create the best web pages you can, you need to learn these things. And here's where you can start:


More Basic HTML Tutorials - This website might look crappy, but that's because it uses no CSS. Despite this, you'll find that the tutorials are very good at explaining the basics of HTML.


Also, there are a large number of tutorials on HTML and CSS as well as other web-scripting languages such as Action Script, Java Script, PHP, Ajax and Cold Fusion on Lynda.com.

Wednesday, November 10, 2010

DMS Help - Action Script 3.0 Tutorials for Flash

One of the most difficult things about using Flash can be adding interactivity. Animation is easy, more so in Flash than After Effects. But when it comes in interactivity in Flash users often find themselves quickly mired in Action Script.

Adobe's latest iteration of Action Script, 3.0, is nearly a misnomer. Gone are the days of a simple scripting language. Action Script 3.0 is a fully-functional object-oriented programming language with a robustness akin to Java. While this does offer tremendous power to Flash developers, it also adds a much steeper learning curve.

But here's a solution. If you need Action Script 3.0 advice and solving a particular programming or interactivity problem, check out this website: Flash and Math. The site houses dozens of tutorials explaining not only how to accomplish specific effects such as developing a particle system but also how to learn to program in Action Script 3.0.

Tuesday, November 09, 2010

Todd's Tips - Learn to Shoot Good Video

Have you ever felt like this when you finish a video? Felt like you're carrying the corpse of your dead idea?

Editing can obviously be a big part of making a good video, but before you ever even get to the editing suite, there's a lot
you can do to make your video amazing. You can shoot it well.

Now, for non-film students this might seem like a daunting challenge; without access to high-end video cameras or fancy lighting equipment high-quality shooting seems like a pipe dream. But it doesn't have to be. Here are a few simple tips for shooting good quality video for your class projects with an emphasis on shooting interviews.

These tips are perfect for the Flip UltraHD and Kodak Zi-8 camcorders we have available in Media Services.

1) Use a Tripod. For serious. Nothing detracts from video like shakiness that shouldn't be there. Don't have one? No problem. You can always prop the camcorder on something. The goal here is steadiness.

2) Pay attention to your framing. Framing is the process of moving the camera (or subject) such that the subject is positioned in a dynamic, appealing way. What does that mean? It means using the "rule of thirds."

Basically the rule of thirds splits the frame into three sets of horizontal spaces and three sets of vertical spaces. Where these thirds meet might be considered sweet spots. Like this:

Also notice here that this fellow is facing toward the part of the frame in which there is MORE space. This is called "nose-room." Imagine if he were facing to the right instead? He would look seriously jammed against the side.

Finally, see how the top of his head is cut off a bit by the top of the frame. That's called "head-room." It's generally ok to cut off the top bit or let a subject's head have a touch of space between it and top of the frame. Go lower than that and it'll look like the poor fellow is about to fall out of the bottom of the frame.

So when you set up your shot, take your time and make sure it looks appealing.

3) Light Your Subject. Even if you just tilt the shade of a lamp a bit to brighten up your subject's face, do so.

Or you could use a reflector to reflect some local ambient light onto your subject. And this is as simple as stretching some aluminum foil over some cardboard. Like the one to the left.

Believe me, it makes a huge difference. But lighting is a huge subject in itself. So checkout Videomaker magazine's website. They have a massive repository of educational articles and videos. Here are the ones on lighting.

4) Finally, and perhaps most important, test your gear before you get to your shoot. Make sure it works and you know how to work it.

Here's the link to the main teaching section of Videomaker's website. There are sections on pre-production, production and post-production. All are worth spending a bit of time on, even if you are only doing a short piece for your Anthropology class.

Tuesday, September 28, 2010

DMS Help - Simple CSS Tutorial


Lately we've had some requests for CSS help here in Media Services. Apparently there are some classes here that have their students hand code CSS for various projects. Moreover, for anyone in the web design, communications or journalism worlds, it's good to have some idea of what CSS is and what it can do.

This is a great text tutorial that gives a highly readable and easy-to-understand introduction to CSS.

Saturday, September 18, 2010

Todd's Tips - Extracting Audio in iMovie

Let's say, for example, you have to do a project about campus. You get a FlipCam from Media Services and you shoot some video. You record some voice-over and you're ready to put your video together. But, when you look over your footage you find that the audio from the footage you shot of campus is filled with sirens and the other sounds of city traffic. Problem.

One way you could handle this to simply turn down the sound

on the video clip. But, you could also remove the audio from the video clip entirely (and even replace it with something else, like your voice-over or music).

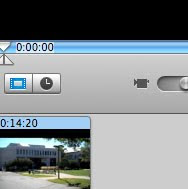
To do this in iMovie HD you'll need to be in timeline mode. On the bottom left-hand corner of the program there's a little button with a clock icon.


Once you've clicked on that, the video-building interface on the bottom of iMovie will change to look like this:


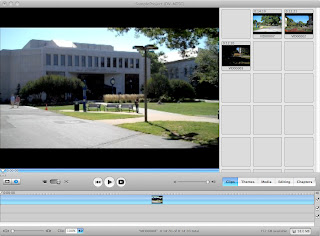
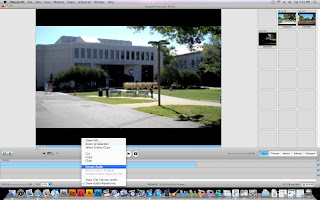
Here a blue bar represents your video instead of a small box. Once you have the timeline view up, right click on the video (the blue bar) to bring up a small menu. In that menu select "Extract Audio," as seen here:


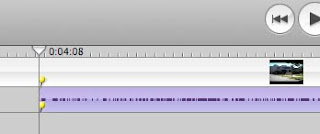
Finally, once you select "Extract Audio" the clip will split with the blue bar (your video) above and a purple bar (when selected) with darker purple waveforms below (your audio).

The audio and video tracks may now be moved independently of each other. You can also delete one or the other by selecting one and hitting the "Delete" key. You can also cut the audio clips just like you cut video (by hitting "Apple T")

Be mindful though, if you begin playing with your audio track you can move audio out of synch with video which can be a real problem if your video is of someone speaking.

Friday, August 13, 2010

DMS Help - Record and Edit Audio with Audacity

Ever wanted to make you own podcast? Have all this amazing stuff on your computer that you've recorded, but have no idea how to edit it?

Well, here's your chance. Download the free audio editing software Audacity (for Mac and PC) and start broadcasting yourself.

Got it already and don't know how to use it? This easy-to-follow tutorial manual, written by the Audacity folks, can help you understand digitized sound and how you can use Audacity to edit sound.